Tensorflow Mnist手写数字识别Go实战
Tensflow安装好以后,当然要上手折腾一下啦。其实Tensorflow的入门教程很多地方都有,官方的Tutorials也写的很好。所以在这里记录一下本人折腾的过程,做一些补充。
基础知识
首先学习Tensorflow的基本使用和关于神经网络的知识,这里推荐的教程有:
本文所用代码放在了github上,如果想编译运行请将项目clone到$GOPATH/src下
训练模型
我们先训练一个最简单的识别模型,代码码改自https://github.com/martin-gorner/tensorflow-mnist-tutorial
# mnist_softmax.py
import argparse

import tensorflow as tf
from tensorflow.examples.tutorials.mnist import input_data
from tensorflow.contrib.session_bundle import exporter


def main(flags):
    mnist = input_data.read_data_sets(flags.mnist_data_dir, reshape=False, one_hot=True)

    # neural network with 1 layer of 10 softmax neurons
    #
    # · · · · · · · · · ·       (input data, flattened pixels)       X [batch, 784]        # 784 = 28 * 28
    # \x/x\x/x\x/x\x/x\x/    -- fully connected layer (softmax)      W [784, 10]     b[10]
    #   · · · · · · · ·                                              Y [batch, 10]

    # The model is:
    #
    # Y = softmax( X * W + b)
    #              X: matrix for 100 grayscale images of 28x28 pixels, flattened (there are 100 images in a mini-batch)
    #              W: weight matrix with 784 lines and 10 columns
    #              b: bias vector with 10 dimensions
    #              +: add with broadcasting: adds the vector to each line of the matrix (numpy)
    #              softmax(matrix) applies softmax on each line
    #              softmax(line) applies an exp to each value then divides by the norm of the resulting line
    #              Y: output matrix with 100 lines and 10 columns

    # input X: 28x28 grayscale images, the first dimension (None) will index the images in the mini-batch
    X = tf.placeholder(tf.float32, [None, 28, 28, 1])
    # correct answers will go here
    Y_ = tf.placeholder(tf.float32, [None, 10])
    # weights W[784, 10]   784=28*28
    W = tf.Variable(tf.zeros([784, 10]))
    # biases b[10]
    b = tf.Variable(tf.zeros([10]))

    # flatten the images into a single line of pixels
    # -1 in the shape definition means "the only possible dimension that will preserve the number of elements"
    XX = tf.reshape(X, [-1, 784])

    # The model
    Y = tf.nn.softmax(tf.matmul(XX, W) + b)

    # loss function: cross-entropy = - sum( Y_i * log(Yi) )
    #                           Y: the computed output vector
    #                           Y_: the desired output vector

    # cross-entropy
    # log takes the log of each element, * multiplies the tensors element by element
    # reduce_mean will add all the components in the tensor
    # so here we end up with the total cross-entropy for all images in the batch
    cross_entropy = -tf.reduce_mean(Y_ * tf.log(Y)) * 1000.0  # normalized for batches of 100 images,
    # *10 because  "mean" included an unwanted division by 10

    # accuracy of the trained model, between 0 (worst) and 1 (best)
    correct_prediction = tf.equal(tf.argmax(Y, 1), tf.argmax(Y_, 1))
    accuracy = tf.reduce_mean(tf.cast(correct_prediction, tf.float32))

    # training, learning rate = 0.005
    train_step = tf.train.GradientDescentOptimizer(0.005).minimize(cross_entropy)

    # init
    init = tf.global_variables_initializer()
    sess = tf.Session()
    sess.run(init)

    for i in range(flags.iterations):
        batch_X, batch_Y = mnist.train.next_batch(flags.batch_size)

        # the backpropagation training step
        sess.run(train_step, feed_dict={X: batch_X, Y_: batch_Y})

        print("Iteration:" + str(i) + "/" + str(flags.iterations))

    print("******* Training is Done! *******")

    print("Accuracy:", sess.run(accuracy, feed_dict={X: mnist.test.images, Y_: mnist.test.labels}))

    # Export model to Tensorflow Serving
    saver = tf.train.Saver()

    model_exporter = exporter.Exporter(saver)
    model_exporter.init(
        sess.graph.as_graph_def(),
        named_graph_signatures={
            'inputs': exporter.generic_signature({'x': X}),
            'outputs': exporter.generic_signature({'y': Y})
        }
    )
    model_exporter.export(flags.model_dir, tf.constant(flags.model_version), sess)
    print("Model Saved at", str(flags.model_dir), "version:", flags.model_version)


if __name__ == '__main__':
    parser = argparse.ArgumentParser()
    parser.add_argument(
        '--learning_rate',
        type=float,
        default=0.05,
        help='Initial learning rate.'
    )
    parser.add_argument(
        '--iterations',
        type=int,
        default=2000,
        help='Number of iterations to run trainer.'
    )
    parser.add_argument(
        '--batch_size',
        type=int,
        default=100,
        help='Batch size.  Must divide evenly into the dataset sizes.'
    )
    parser.add_argument(
        '--mnist_data_dir',
        type=str,
        default='./MNIST_data',
        help='Directory to put the mnist data.'
    )
    parser.add_argument(
        '--model_dir',
        type=str,
        default='./model',
        help='Directory to export model.'
    )
    parser.add_argument(
        '--model_version',
        type=int,
        default=1,
        help='Model version'
    )

    FLAGS, unparsed = parser.parse_known_args()

    main(FLAGS)
运行mnist_softmax.py, 第一次运行会在默认路径下载mnist数据。
python mnist_softmax.py
softmax模型正确率在92%的左右。训练的模型默认保存在./model目录下。 可以在./model/下看的多了个00000001的文件夹,里面存放的是版本号为1的模型数据。
Tensorflow Serving
有了模型之后我们还要将其做成产品,Tensorflow提供了Tensorflow Serving,可以将训练的模型直接做成一个rpc服务,外部可以通过调用rpc来获取模型输出的结果。 下面我们做一个MNIST手写数字识别的web应用来实践一下。
项目代码在放在[github]()上,前端用jquery + drawingboard.js, 后端用Go做API Server, 通过grpc调用Tensorflow Sering获取识别结果。
编译Tensorflow Model Server
具体参照Tensorflow Serving官方文档, 目前版本的Tensorflow Serving在OSX上编译有问题,不过还好官方提供了编译环境的Dockerfile, 跟着走一遍教程就好。
配置好环境以后我们编译tensorflow_model_server。
cd serving
bazel build //tensorflow_serving/model_servers:tensorflow_model_server
如果不想编译那么麻烦的话,可以用我做的tensorflow_model_server的docker镜像, 当前对应的tensorflow serving的版本是v0.5.1
docker pull sineyuan/tensorflow_model_server
cd tensorflow-demo
docker run  -v $PWD:/work -p 8500:8500  sineyuan/tensorflow_model_server --model_base_path=/work/mnist/model
运行Tensorflow Model Server
运行tensorflow_model_server, 指定训练模型的路径:
bazel-bin/tensorflow_serving/model_servers/tensorflow_model_server --model_base_path=${path_to_tensorflow_demo_root}/model
tensorflow_model_server默认监听8500端口。
生成Tensorflow Serving的Go客户端包
tensorflow_model_server使用的是google自家的grpc框架, 官方例子的客户端是基于python的,没有提供Go客户端包。不过grpc是跨语言的,我们需要通过tensorflow serving提供的protobuf文件自己编译。
先安装grpc, 看官方的安装文档http://www.grpc.io/docs/quickstart/go.html。
下载Tensorflow Serving源码。
git clone --recurse-submodules https://github.com/tensorflow/serving
cd serving
准备编译脚本gen_proto.sh:
#!/bin/sh

output=${1:-vendor}

echo $output

mkdir -p $output

mkdir -p protobuf/src/google/protobuf
cp $GOPATH/src/github.com/golang/protobuf/ptypes/any/any.proto protobuf/src/google/protobuf/any.proto
cp $GOPATH/src/github.com/golang/protobuf/ptypes/wrappers/wrappers.proto protobuf/src/google/protobuf/wrappers.proto

protoc -I=. -I=./tensorflow -I=./protobuf/src --go_out=plugins=grpc:$output ./tensorflow_serving/apis/*.proto

protoc -I=./tensorflow --go_out=plugins=grpc:$output tensorflow/tensorflow/core/example/*.proto
protoc -I=./tensorflow --go_out=plugins=grpc:$output tensorflow/tensorflow/core/framework/*.proto

protoc -I=./tensorflow -I=./protobuf/src --go_out=plugins=grpc:$output \
	tensorflow/tensorflow/core/protobuf/saver.proto  \
	tensorflow/tensorflow/core/protobuf/meta_graph.proto

rm -r protobuf
将gen_proto.sh放在下载的Tensorflow Serving源码目录下, 在源码目录下执行:
sh gen_proto.sh
在源码目录下即可生成vendor文件夹,将vendor文件夹放到我们的Demo项目目录下即可。
Go API Server
用Go写一个简单的API Server展示Tensorflow Serving的调用方法, 为了省事,直接用了echo这个web框架。
gprc调用Tensorflow Serving的具体方法参见下面代码
package main

import (
	"fmt"
	"flag"
	"context"
	"strconv"
	"net/http"
	"io/ioutil"

	"github.com/labstack/echo"
	"google.golang.org/grpc"

	tf_framework "tensorflow/core/framework"
	pb "tensorflow_serving/apis"
)

var (
	port         int
	model_server string
	model_name   string
)

func init() {
	flag.IntVar(&port, "port", 1323, "concurrent processing ,default 1 .")
	flag.StringVar(&model_server, "model_server", "localhost:8500", "concurrent processing ,default 1 .")
	flag.StringVar(&model_name, "model_name", "default", "concurrent processing ,default 1 .")

	flag.Parse()
}

type Resp struct {
	Success bool
	Msg     string
	Result  [10]float32
}

func main() {
	e := echo.New()
	// Set up a connection to the model server.
	conn, err := grpc.Dial(model_server, grpc.WithInsecure())
	if err != nil {
		e.Logger.Fatalf("can not connect model_server: %v", err)
	}
	defer conn.Close()

	client := pb.NewPredictionServiceClient(conn)

	e.Static("/", "templates")
	e.Static("/static", "static")

	e.POST("/api/mnist", func(c echo.Context) error {
		req := c.Request()
		body, err := ioutil.ReadAll(req.Body)
		if err != nil {
			return err
		}
		result, err := Predict(client, body)
		if err != nil {
			e.Logger.Error(err.Error())
			return c.JSON(http.StatusOK, &Resp{
				Msg: err.Error(),
			})
		}

		return c.JSON(http.StatusOK, &Resp{
			Success: true,
			Result:  result,
		})
	})

	e.Logger.Fatal(e.Start(":" + strconv.Itoa(port)))
}

func Predict(c pb.PredictionServiceClient, imgBytes []byte) (result [10]float32, err error) {
	// 构造请求
	req := &pb.PredictRequest{
		// model名由tensorflow_model_server的启动参数 --model_name 指定, 默认是default
		ModelSpec: &pb.ModelSpec{Name: model_name},
		Inputs:    make(map[string]*tf_framework.TensorProto),
	}
	in := normalize(imgBytes)

	// 输入数据
	tp := &tf_framework.TensorProto{
		Dtype:    tf_framework.DataType_DT_FLOAT,
		FloatVal: in,
		// 由于输入只能是一个slice,所以要在这里声明输入数据的shape
		// Tensorflow Model Server将数据resize成输入Tensor需要的shape
		TensorShape: &tf_framework.TensorShapeProto{
			Dim: []*tf_framework.TensorShapeProto_Dim{
				&tf_framework.TensorShapeProto_Dim{
					Size: int64(1),
					Name: "batch",
				},
				&tf_framework.TensorShapeProto_Dim{
					Size: int64(784),
					Name: "data",
				},
			},
		},
	}
	// 输入参数名要与模型导出时指定的一致
	req.Inputs["x"] = tp

	// 请求Model Server
	resp, err := c.Predict(context.Background(), req)

	// 输出参数名要与模型导出时指定的一致
	output, ok := resp.Outputs["y"]
	if !ok {
		err = fmt.Errorf("can not find output data with label y")
		return
	}
	if len(output.FloatVal) != 10 {
		err = fmt.Errorf("wrong output dimension, it should be 10, now got %d", len(output.FloatVal))
		return
	}
	copy(result[:], output.FloatVal)
	return
}

func normalize(bytes []byte) (r []float32) {
	r = make([]float32, 0, len(bytes))
	for _, b := range bytes {
		r = append(r, float32(255-b)/255)
	}
	return
}
注意输入输出的签名是在模型导出的时候指定的
# mnist_softmax.py
   .....
    model_exporter.init(
        sess.graph.as_graph_def(),
        named_graph_signatures={
            'inputs': exporter.generic_signature({'x': X}),  # 指明输入的参数名为x,类型维度和Tensor X 一样
            'outputs': exporter.generic_signature({'y': Y})  # 指明输出的参数名为x,类型维度和Tensor Y 一样
        }
   )
   ....
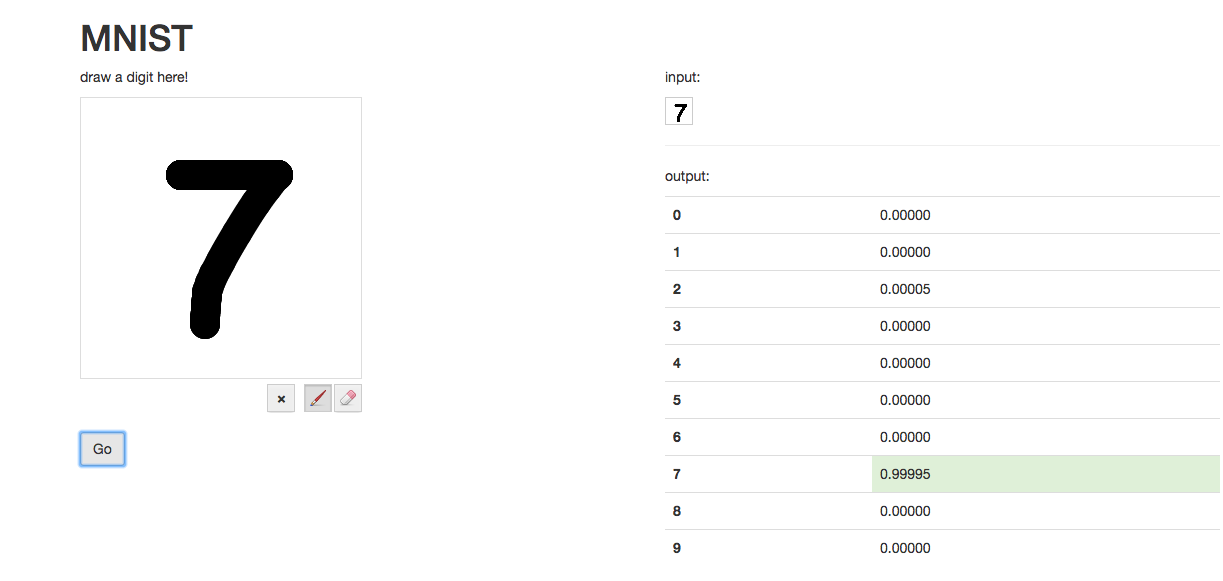
运行main.go后可以在http://localhost:1323访问web页面。
效果图:
模型更新
有了前面的工作后,下面的就轻松了。现在我们来升级模型,直接上卷积神经网络。代码在https://github.com/SineYuan/tensorflow-demo/blob/master/mnist/mnist_cnn.py
cd mnist
python mnist_cnn.py --model_version=2
卷积神经网络正确率在98%的左右。我们可以看到model目录下多了个00000002的文件夹,此时如何tensorflow_model_server还在运行的话会自动加载新的版本为2的模型,就是那么简单。